Thursday 31 March 2016

Using Johnson's Baby Shampoo as Makeup Brush Cleanser


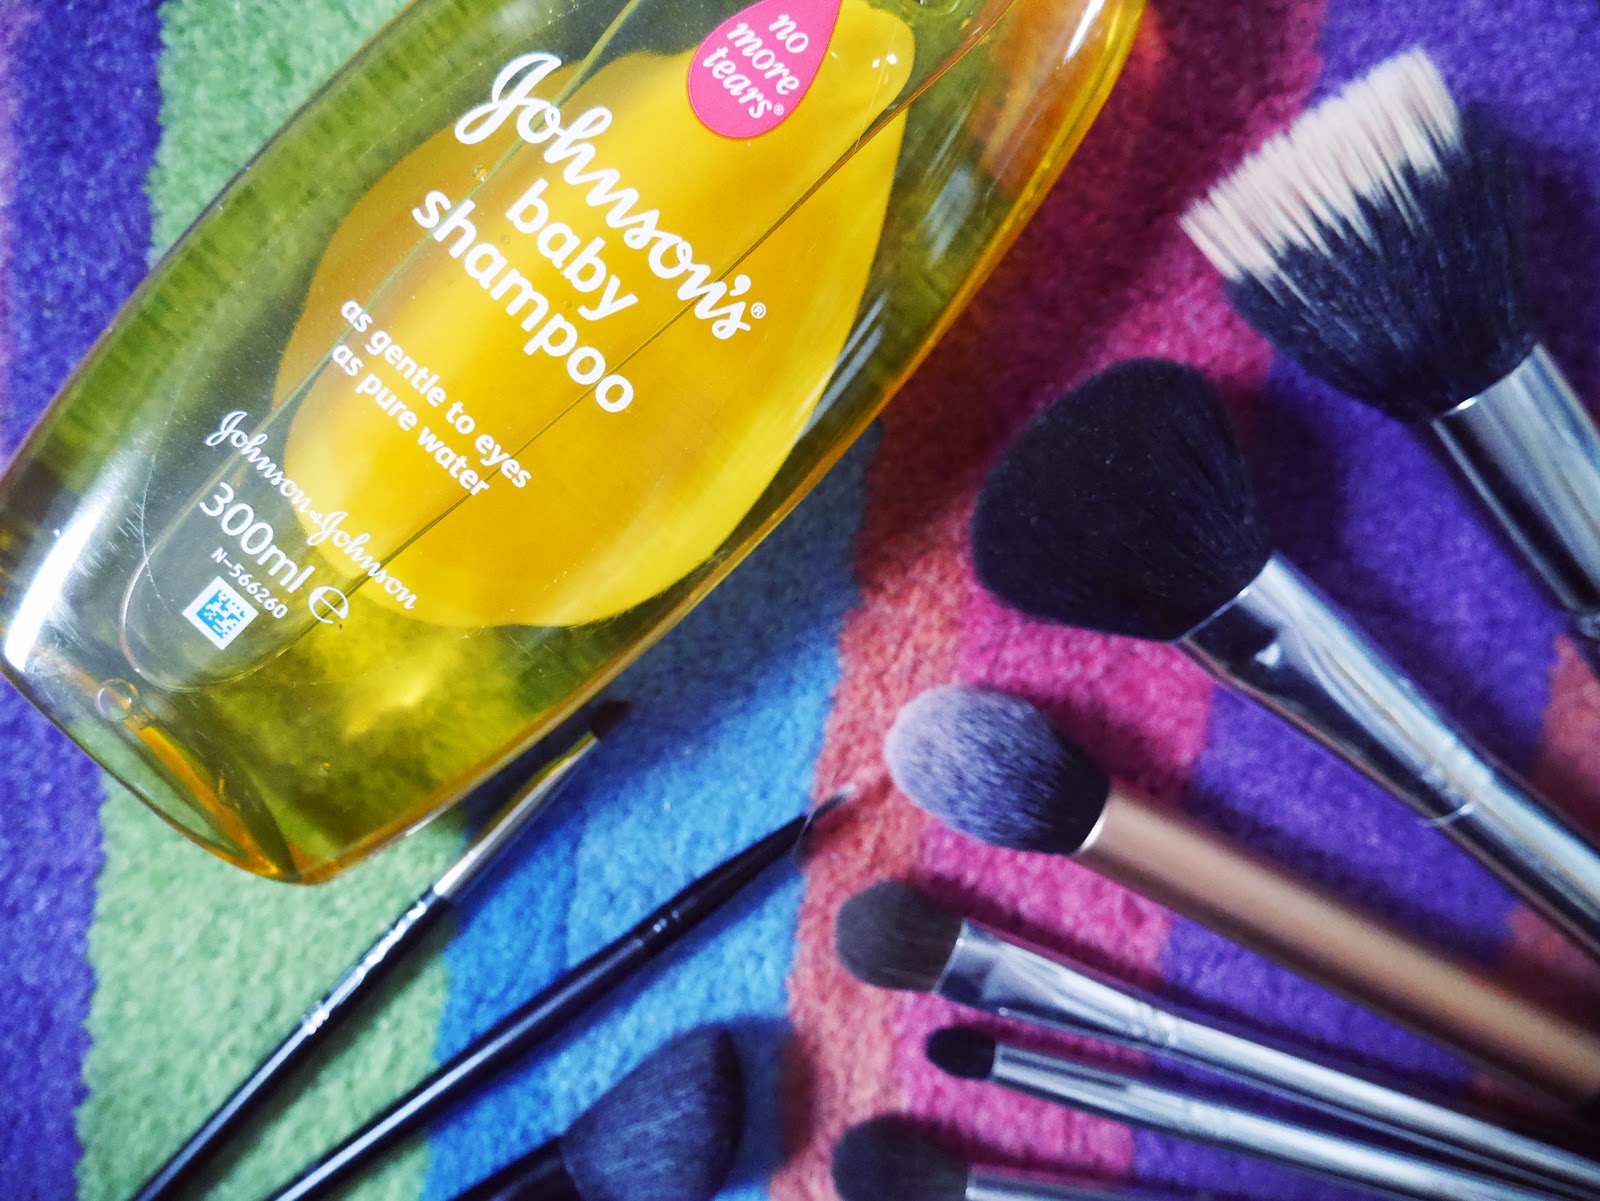
One of the things which is always on my to-do list, yet rarely seems to get done, is washing my makeup brushes.  I don't know what it is about this small, menial task, but it seems to take me days and days to psyche myself up for this job.  Having previously always used whatever I could get my hands on to wash my makeup brushes, - usually either hand or face wash, or sometimes standard shampoo - I recently came across an article (which I now can't for the life of me find) advocating Johnson's Baby Shampoo as the perfect inexpensive and effective product to use for cleaning brushes.  
I love any excuse to try something new, and if it meant I was going to start paying a bit more attention to my poor brushes, then good.  I picked it up in a 300ml size, I'm not sure if they come smaller, but this was £2.09 in Superdrug and having just checked online it's currently £1 in Tesco.  I think price wise, you can't really argue against that for value for money.  As you might expect with baby shampoo it's fairly gentle, and lightly scented, but still cleaned my brushes an absolute treat.  


When washing my brushes, I fill up a basin with hot water, chuck all my brushes in along with a lashing of the shampoo, and shake them around for a bit.  Then I'll do each brush individually, cleaning them on my inside palm using a little bit more baby shampoo for each brush and gently swirling the brushes, then rinsing, and repeating until the water runs clean.


All in all, it probably takes me under 10 minutes - the cat's out the bag now and I've no more excuses not to be regularly washing my brushes.  Once I've given them all the individual once-over I lay them out on a towel and leave them overnight to dry naturally. 


I've been really happy with using Johnson's Baby Shampoo as it's a simple, cheap and cheerful product that works perfectly well for cleaning brushes.  How does my method compare to how you clean your makeup brushes?  

Ruby x


Follow

Sunday 27 March 2016

Styling Ankle Swingers, Part Two - Evening


Hello and welcome to Styling Ankle Swingers Part Two - the evening look.  I've had a terrible accident with my keyboard and for some reason none of the keys along the bottom rows are working - that includes the arrow keys, the shift key, the ctrl key... basically anything important, making blogging/essay writing/anything else extremely labour intensiveI don't know what I'm going to do about it, if anyone has any suggestions please help a sister out.  I think it might've had something to do with me spilling some tea on my keyboard yesterday... it was only a tiny bit though, I swear!!!

These trousers (in case you missed part 1 of my trouser worship, click here
) are also, conveniently, perfect for evening looks.  I think the great thing about big ol' flares is they go with pretty much any type of heel - I love these equally with strappy, chunky heels, or flatforms.  Plus, as I said before, they're the comfiest thing on God's earth, which means if you do want to go out and drink all the beer you can handle, they'll just stretch along with your belly (that's what I really look for in a pair of trousers)! 

I have recently been in love with this body I got from Monki while I was in Tokyo.  As I mentioned in this post, Monki is pretty darn cheap in Japan, and so I couldn't resist this, which I think worked out around £8 in the end.  Unfortunately I can't find it online so I've linked something similar on ASOS.  


Trousers - Urban Outfitters / Body - Monki (similar here) / Shoes - Urban Outfitters
Shirt - Vintage / Handbag - Choies (old)

I generally find that the older I get, the more I like to keep it kind of simple for an evening out or a dressy event.  Gone are the days of my just about butt-covering skirts and mini shorts... I much prefer to feel comfortable on a night out now so I can dance the evening away without worrying about anything falling out.  My go-to recently has also been the lovely shade of lipstick I'm wearing, which is one called 'Rio Rio', from Topshop's range.  I actually really like the formula of this - it's matte, but not at all drying, and the colour is very intense and long-lasting.


Thanks again for reading everyone, feel free to leave me a little comment below and by all means link your blog and I'll check you out.  I love to hear from you!!!  And so finally, here's a picture of my hair doing the Mexican wave.

Ruby x


Follow

Thursday 24 March 2016

Styling Ankle Swingers, Part One - Daytime


I picked up these wide leg trousers not too long ago in one of my favourite shops - yes, it was the infamous Urban Outfitters.   I just can't get enough of that place, really.  I had been in there a couple of weeks prior, skulking among the sale rails (as per usual) when I spotted these beauties.  You can imagine how crestfallen I was when I found out they had been put in the sale rail by mistake and were in fact a whopping £46.  Fast forward to my module results day and I decided that that was the day, I had earned them, they deserved me, we couldn't be apart and the price tag was no issue.  

The fit is great, as they have a thick elasticated waistband and skim over all the right bits.  Josh couldn't quite understand why they stopped just above the ankle, and has since dubbed them 'the ankle swingers' - as much as I keep telling myself that boys just don't understand fashion, the name has stuck - they are most certainly ankle swingers, and I love them all the same.  I find that their slightly awkward length makes choosing shoes tricky... I think the answer is, all shoes look funny with these, purely because they're kind of funny trousers.  That's all part of their charm!  For a daytime look with these, I like to wear a loose fitting jumper or thin jersey top and pair it with a denim or vintage sports jacket and trainers or lace up dolly shoes if I'm feeling a bit more feminine.  


Jumper - Urban Outfitters  (similar here) / Trousers - Urban Outfitters / Trainers - Nike 
Denim Jacket - Vintage (similar here) / Bag - Urban Outfitters


 In my next post I'll be posting an idea of how to style these for evening looks - I would say they're actually a little bit easier to style for an evening look than daytime, as they look great with pretty much any type of heel.  That's all for today amigos - let me know what you think!

Ruby x


Follow

Thursday 17 March 2016

Smashbox Step-By-Step Contour Kit Review


Good evening!  I've had my eye on a new contour product for a little while, having used Mac's pressed powder blush in Harmony religiously for the past 2 years or so - I still haven't even hit pan (that product just goes on and on!), but unfortunately I was itching to try something new.  I'd read quite a few reviews for Smashbox's step-by-step contour stick trio and originally went into Boots with that on my shopping agenda... however.  The lovely lady on the Smashbox counter sat me down and tried both the stick trio and the powder trio on each half of my face, and I'm so glad she did.  I prefer a fairly light, blendable contour, and on my skin the contour sticks unfortunately looked a little bit like I'd patted a clump of mud under my cheekbone.  The pressed powder however, applied like a dream.  20 minutes and £35 later, I walked out, palette in hand, almost foaming at the mouth with excitement.  

I have to admit, I can't do the same job as the lady on the counter, obviously.  I feel like it's going to take me a little bit of practice to get the hang of it, especially with me not exactly being the contour queen.


But the colours are lovely - this comes in two shades, I got mine in the lighter shade.  From left to right are the contour, bronze and highlight shades.  The contour is a cool greyish brown, the bronzer a tad warmer, and the highlight a creamy magnolia sort of shade.  All three are matte, and quite densely packed.  The bronzer and highlight shade definitely have a higher fallout than the contour, but the palette itself contains 11.47g of product which I think is pretty generous considering the Mac blush I mentioned at the start (which I've been using since forever) is only 6g!  I love the packaging too, it's very sleek and streamlined but still easily fits into my makeup bag.  The palette is just a little bigger than the Naked Basics palette if that works as a comparison for anyone.  


It also comes with a contour brush 'free' (oh that deceptive word), which has actually proved itself to be great.  Previously I was using the Real Techniques contour brush from the core collection, which was okay, but actually tended not to pick up as much product or provide as much precision when compared to the Smashbox brush.  Below you can see the product in action on my usually very one dimensional face...


I'm very basic and just follow the instructions you get with the palette.  Included is a little leaflet which tells you the different contouring techniques for different face shapes, and stuck onto the mirror is a rough guide.  I've been using contour just under my cheekbones, around the top of my forehead and hairline, either side of my nose and a tiny bit under my chin - but like I said, only a very light swish as I'm generally not a fan of heavier contour looks.  I use the bronzer just above the contour on my cheekbones, then sweep highlighter just above this, and just under, as well as down the bridge of my nose and just above my cupid's bow.  The colours work great together, are super buildable, and blend to give a lovely matte finish which also lasts for hours.

This is the finished look...


All in all, £35 well spent.  Not something you'll hear me say often!  Has anyone else tried this or the contour stick trio instead?  What did you think!?

Ruby x


Follow

Friday 11 March 2016

The Classic


My 10 year old self probably never would've thought I'd be wearing Reebok Classics again at the ripe old age of 20... my first pair of real trainers were Classics in white, with a nice bit of iridescent pink accenting and a trendy foamy zig-zag sole.  Flash forward 10 years and I've reinvested in my childhood trainer - this time in black, to match my soul (I'm joking).  For the past couple of years I've always tended to steer towards Adidas trainers, as I find they tend to be quite reasonably priced and super comfy - plus, I've found a few bargain favourites in the Adidas outlet in Gunwharf Quays in Portsmouth (for a bit more on Gunwharf and Portsmouth, check out this post).

But while I was in Japan, I got that all too familiar itching-for-a-new-pair-of-shoes sensation... I knew I wanted trainers, and I knew I wanted something different.  It was a dangerous game to be playing.  But luckily enough Nike trainers aren't really my thing, and nothing in the Adidas store could excite me enough to part with my yen... and that's when Reebok caught my eye.  These ended up costing me around £40 which I don't think is too bad for a trainer, especially as they weren't even on sale or anything!  Having done a bit of research, I've found the particular style (the Reebok 'Princess' haha!) I have online at the Adidas store here for £45... not too shabby at all!  On recent trips to Urban Outfitters I've also spied these in white among their shoe section, so I reckon they could easily be big this year.  They're such a versatile trainer too, especially in black, and so comfy - the dream!


Faux fur coat - Beyond Retro / Bag - Urban Outfitters (old, similar here) / Jumper - ASOS  (now on sale for £15!!!) / Trainers - Reebok / Jeans - Topshop Jamies / Sunglasses - French Connection

I've been loving wearing these really casually with jeans or leggings and big jumpers (ie. today) or using them to dress down smarter pieces like trousers or culottes.  I must also just let you all know that this jumper is 1. so warm, it's been my winter saviour, 2. really really really nice, 3. on sale - go snap it up and make me proud.  Josh very sweetly got it for me for Christmas as a prezzie and I've been living in it ever since.  

Hope everyone's had a great week so far!

Ruby x


Follow

Monday 7 March 2016

Get more for your money: Two skincare saviours that will last forever


Following on from my last skincare-related post where I reviewed a few slightly pricier products from the La Roche Posay range, I thought I'd now dedicate a little time to a couple of products that are a bit cheaper, and even better, seem to go on forever and ever.

We all go through times in our lives where sometimes we just want something that does exactly what it says on the tin/bottle/box, without parting with too much money at the same time.  These products are perfect for those who are looking for a quick and easy two-step cleansing and moisturising process that leaves you feeling clean and fresh as a daisy. 


 First up is this Garnier Pure Micellar cleansing water, currently on offer for just £3.33 at Boots (usually £4.99).  First of all, I think this is an absolute steal considering this is a 500ml bottle, and it even claims up to 200 uses... that's almost 6 months of using every single day (without accounting for those lazy days when pants are too much effort let alone makeup or cleansing).  Secondly, micellar waters are such an efficient product - with a few swipes of this on a cotton pad, my makeup literally melts away.  It's a godsend for removing heavy eye makeup, and I also love that this product is non-greasy, compared with some other eye makeup removers that I've tried, like the Loreal Dermo-Expertise eye makeup remover.  It's also a dream for removing foundation, and leaves your face feeling incredibly fresh and clean.  This is also a great alternative to a lotion cleanser, which I find can be a lot more labour intensive, requiring more product to do the job and often leaving a slightly greasy residue.


 After cleansing with micellar water, this moisturising lotion from Cetaphil is your best friend.  Although this is a little more pricey, at £8.99 (however this was recently on offer for £5.99, so look out for promotions), I cannot begin to explain how long this is going to last me.  The bottle itself is 236ml, which is massive compared to the standard 30-50ml moisturisers I usually buy.  In addition, this is so hydrating that again, a little goes such a long way, especially if you don't have particularly dry skin to start off with.  I find I only need half a pump, rarely more.  Another thing I love about this is the bottle itself - it's so handy to have a pump applicator, and I find myself using it constantly for my hands too, as it's so fast absorbing.  Since using at-home salycylic acid treatments on my face (for more on that, click here to see my full post), I've found my face has been getting quite dry, especially living in windy old Brighton.  For dry or sensitive skin types, I cannot recommend this moisturiser enough.  It's fragrance free, non-comedogenic and is specially formulated to 're-hydrate damaged skin associated with common skin conditions and following dermatological treatments.'  For a functional, no-frills, great value and super-hydrating facial moisturiser, the search is over.

Has anyone else tried either of these products?  What did you think?  

Ruby x


Follow

Wednesday 2 March 2016

Recipe: Spicy Carrot, Sweet Potato and Lentil Soup


 Good afternoon my cherubs.  Today I have for you a warming wintry recipe for what is fast becoming my go-to when I'm exceedingly poor/cold and sad/hungover and hungry (I eat this all the time).  This is very cheap to make, can be produced in vast quantities, and is damn tasty. Introducing... 

Spicy Carrot, Sweet Potato and Lentil Soup


Ingredients: 
- 5-6 medium carrots (around 350g), diced
- 1 onion, diced
- 1 leek, chopped 
- 2 cloves of garlic, crushed
- 2 small sweet potatoes, diced
- 100g of red lentils
- 1-1.5 litres of vegetable stock
- 2 tbsp olive oil
- 2 handfuls of coriander
- salt and pepper, to taste
- dried chilli flakes or piri piri seasoning
- dried coriander
- creme fraiche, to serve


Method

1)  I start by sticking on some music and getting to work chopping everything first... which takes a little while.  Put a large non-stick saucepan on the hob, and on a medium heat, fry the onions, crushed garlic and leeks in the olive oil until just beginning to soften.  
2)  Chuck in your carrots, sweet potatoes, and the dried coriander, salt and pepper and dried chilli flakes then stir like crazy, adding more olive oil if required.  I tend to use around 2 tsps of dried chilli flakes, for a medium-spicy soup, but use less or more if you want to adjust the spice of your soup.  


 3)  After cooking for 4-5 minutes, pour in your vegetable stock (just enough to cover all the veg, you can add more later if required), and turn up the heat so the soup is simmering.  Here, you can add in a handful of chopped or torn coriander and the lentils. 


4)  Stick a lid on the saucepan, and simmer for 20-25 minutes, or until everything is tender and soft.  Make sure you keep an eye on it, stirring every now and again and topping up with stock when it boils off.

5)  Once everything's been cooked, take the saucepan off the heat and prepare to blend.  You don't have to blend your soup if you prefer it chunky or don't have a blender... it's equally delicious.  


6)  I use the Breville Blend Active  blender, which is probably one of the best things I've bought - it's a really good (and much cheaper - only £19.99!) alternative to the if slightly more stylish Nutri Bullet.  You can also just use a hand blender, whatever floats your boat.  I tend to add in a bit more water before blending to avoid the baby food consistency you sometimes get with homemade soups.  Blend it in batches, and load into all the tupperware you can find - this tends to make around 5-6 portions of soup.  

7)  Leave to cool before popping in the fridge.  Or, eat immediately, serving with a spoonful of creme fraiche, salt, pepper, more chilli flakes if desired and a sprinkling of more fresh coriander.  Bon appetit!


So, there we have it.  A healthy, hearty, wholesome soup for these cold, cold days.  Enjoy!

Ruby x


Follow